Thursday, October 30, 2008

Choosing Colors for the Exterior

We were fastidious when it came to the color of the exterior walls. Earlier, the contractor had made a mistake assuming that we would be going for pristine white like most new houses today. They were in for a shock when we wanted it re-painted greenish grey. Double the work, and more costs. We showed our architect pictures of a house we saw in an architecture magazine, and requested to replicate the same color. The house (located in Venice, California) was finished in green black plastered cement, and not exactly painted. We like our house to blend into a green environment as if it's an extension of the nature. As you can see from the photos here, the two wild scrubs at the back of our house have grown so impressively in the past few months that they now look more like trees. We love them. Apart from acting as cool shades, they add to the natural environment that we so long for.
It took nine strong men to hoist this piece of glass panel above the study room. I gritted my teeth and my heart raced as I watched over. Although it's tempered and extra thick, one wrong move would send the glass panel crashing to the ground. A dangerous moment indeed.
Workers are seen here clearing the sewage trench for inspection by the authorities next week. Once approved, the trench will be covered with soil and timber deck.

Sunday, October 26, 2008

Singapore Chilli Crab & More

It was about 2.30pm. We were shopping for bathroom accessories and kitchen faucets for our new place when YS called to say he'd be giving us a dinner treat. He just purchased two gigantic Sri Lankan crabs from the KK wet market, and promised us a hearty meal. Yan's mother almost flipped when she heard that the crabs would have to be killed just before cooking in order to preserve its freshness, i.e. the killing will have to be done right in her kitchen. Nobody was thrilled at the idea, frankly, but we just couldn't resist a scrumptious dinner of chilli crab and steamed crab. Three hours later, YS and wife turned up with a huge brown bag, and straight to the kitchen, they went. I tagged along like a curious inquisitive child. Out came YS' prized acquisition, each of the crab weighing no less than 1.5 kg. 
The crabs were first given a thorough scrub.
YS said the killing will be done humanely and with surgical precision. In a single clean jab at a small hole behind the flab of the crab, using a sharp object (he used a chopstick), the crab was swiftly dispatched.  I looked away as this was done. Next, he began to skillfully prepare the crab pieces.
He then heated up the wok with some oil for a minute or two, and poured in his special Singapore chilli sauce.
Crab pieces were then added to the curry, constantly stirring to ensure they were evenly covered with the curry. The lid is lowered to cover the wok, allowing the crabs to be simmered for about 5 minutes.
While the crab was simmering in the wok, he diluted a few teaspoon of corn flour with water to use as thickening agent, and beat a few eggs in a separate bowl. The thickening liquid is then added, fire was turned off, and lastly the egg mixture was added to enhance the appearance of the dish.
He stirred the crab for a minute or two, and then arranged them on a serving plate.
Next, garnishes was prepared.

And that was the first dish of the night - the famous Singapore Chilli Crab! He deftly moved on to the next crab. This was bigger than the first (weighed about 1.8 kg), because he knew Yan and I prefer the steamed version. Only the freshest of crabs will make the cut for this kind of preparation, as there were virtually no other ingredients (apart from Chinese rice wine and egg whites which were used more as flavor enhancer at the last cooking step).
He carefully arranged the crab on a serving plate, placed it over a steamer, and allowed steaming for about 5 to 7 minutes.
The crab turned bright orange red when it was done.  Egg whites was added, to be followed by a dash of rice wine. The lid was put back on for another 1 minute, and the second dish was ready!
On the side, I prepared chicken and potato curry, using the leftover rendang from a few days ago. I first sauteed potatoes (chunky cuts) in a hot pan until golden brown, and then stir fried the chicken pieces.  The two were mixed together, and rendang curry is poured over.  I let the concoction simmer for approximately 20 minutes.
The third dish - Chicken and Potato curry - was ready in less than half an hour!
While the dishes were being prepared by YS and Chef C separately, YS' wife steamed some Man Tou (chinese plain buns).  Man tou goes really well with curry dishes, and is an excellent alternative to rice or noodle.
And we were ready for a scrumptious meal cooked in style! So cheers!

Friday, October 24, 2008

Malaysian Curry - Beef Rendang

My baker friends have been a constant source of inspiration for me in the last two months. I have not cooked traditional Malaysian cuisines for some time now. Having read Zaeda's testimony in her blog that a way to win a man's heart is through his stomach, and that how her husband always look forward to home-cooked dinner, I think to myself; "There must be some truth to this adage". Zaeda talked about her mother's secret recipe named "Rendang Babu", and said she doesn't know how the name came about. From what little I know, "Babu" in Tamil means "male or boy". This recipe could have been inspired by a fusion of Indian and Malay curry - perhaps Indian ingredients cooked in traditional Malay style, and hence rendang + babu? Could this be right? A fusion recipe? A powerful combination of explosive Indian and Malay flavors that will tempt even the strongest will to resist? 

Here's a look at the ingredients for the rendang paste (adapted from Zaeda's blog):
30g dried chilli
1 medium-sized onion
3-4 cloves of garlic
3cm ginger
Homemade Rendang Paste
Other ingredients:
1 kg beef (the shin is an excellent choice - cut into chunky cubes of 3cmx 3cm)
1 cinnamon stick
100ml evaporated milk
50gm tomato puree
salt and sugar to taste
1/2 cup vegetable oil

Cooking Method:
1. Heat oil to saute cinnamon stick and rendang paste until fragrant.
2. Add tomato puree and milk, stirring constantly until thoroughly blended.
3. Add beef cubes and let it simmer in the curry until tender (approximately 1 hour).
4. Add salt and sugar to taste.  Remove from heat, and you are ready to serve.

Rendang Babu simmering in the pot

Thursday, October 23, 2008

Custard Cake

Marina, Zaeda and I found each other on Facebook only about 2 months ago, after more than 20 years apart. We were childhood friends in Malaysia, first knew each other in school and were in the same class for much of our primary and high school. Lanky Zaeda and I were seated together in the last row of our classroom during our Form 4 and 5 (the final 2 years of our secondary school). It was not because we were troublemakers, just that Zaeda and I were a lot taller than many of our classmates then. Marina, on the other hand, was a petite little girl who was almost always seated at the front row. Schooling in those days was fun. We didn't have the luxury of picking our own seats or companion. It was always decided by our class teacher, but none of us ever complained nor did it ever cross our mind that we ought to choose wherever and whoever we wish to sit with. The lack of choices didn't matter to us, we were happy kids nonetheless. Indeed, the simplicity of life and thinking then was a bliss. Those were the formative years. Meeting them over Facebook after 20 years has brought back so many memories of the past. Twenty years is a fairly long time in anyone's lifetime. Zaeda's daughters are now in their teens, while Marina's bundles of joy are already in primary school. There's indeed so much to catch up. Already I have seen many beautiful pictures of their wonderful families and children, posted and constantly updated on Facebook. I share their joy, and can't wait to find out more about them. The uncanny thing is, after all those years apart, with each having gone through such diverse and different life experiences, we somehow ended up sharing a common past-time of baking and cooking, exchanging recipes and marveling at each other's creation. Life has a strange way of bringing people together.
Below is an adaptation of Marina's prized custard cake recipe.  In her original recipe, she has a layer of caramel before the custard. I took some short cuts, ignore the caramel and went straight to making the custard. As a substitute for the caramel layer, one could sprinkle fine sugar over the custard when the cake is done, and place it under the broiler for browning (in the same way as creme brulee).  This cake is best served chilled.

Custard
4 large eggs
500ml fresh milk
70g castor sugar
1 teaspoon pure vanilla extract

Cake
70g all-purpose flour
60g fine sugar
2 eggs
20g butter (melted)

Method
1. Grease an 8-inch cake pan with softened butter. Pre-heat oven to 170 deg C.  Melt 20g of butter over low heat and let it cool.
2. Prepare custard. Heat milk together with sugar over fire until sugar melts. Whisk eggs and vanilla extract in a separate bowl. Pour hot milk into the egg mixture. Stir gradually to avoid forming bubbles.  Strain custard into the cake pan, skimming off any foam or bubbles.
4. Prepare cake batter. Separate egg yolks from whites. Whisk egg whites with 30g of sugar till soft peak forms. Whisk yolk with remaining sugar till creamy. Combine the two.
5. Sift flour into the egg mixture. Fold gently.
6. Add melted butter into the cake batter. Combine gently.  Pour batter into cake pan containing custard prepared earlier (the batter will float over custard naturally). 
7. Place the cake pan over hot bath and bake in the oven for about 40 minutes.

Monday, October 20, 2008

Pumpkin Spiced Cake


This is the time of the year where one will find a preponderance of pumpkin-based recipes online. I like searching online for well-reviewed tried and tested recipes, and do occasionally log onto Youtube for additional materials. One will be surprised how magnanimous the baking world is (tongue-in-cheek, haha). Any way, during one of my routine website flipping, I came across some very tempting pictures on www.joyofbaking.com about pumpkin recipes. Beside the mouth-watering pictures, I have most of the ingredients required by the recipe and this helped to set my mind on trying it out. The recipe does say that one can make one's own pumpkin puree from fresh pumpkins, but this would be far too tedious for someone like me who doesn't appreciate fastidious/challenging recipes. So I set out to the Paragon Market Place to look for canned pumpkin puree, and lo, there were a few cans of Libby's 100% pure pumpkin puree sitting at the bottom shelf. That sealed the deal!  The canned pumpkin puree tasted just like freshly made puree.
Other Key Ingredients
Pumpkin Spiced Cake
1/2 cup (110 gm) butter
1 1/4 cup brown sugar
2 large eggs
1 cup umpkin puree
1 teaspoon vanilla extract
2 cup cake flour
1/4 teaspoon baking powder
1 teaspoon baking soda
1/2 teaspoon salt
1/2 teaspoon ground cinnamon
1/2 teaspoon ground spices
1/2 cup buttermilk

1. Line two 8-inch round cake pans with parchment paper. Pre-heat oven at 177 deg C.
2. Cream butter and brown sugar with an electric mixer on high speed (2-3 minutes) until light and fluffy
3. Add eggs one at a time. Mix well.
4. Add vanilla extract. Mix well.
5. In another bowl, whisk together cake flour, baking powder, baking soda, salt, cinnamon and spices.
6. Add the cake mixture and buttermilk into the butter mixture. Begin and end with the cake mixture. Mix sufficient to combine the ingredients, taking care not to over-mix.
7. Bake the cakes for approx. 1 hour or until a toothpick inserted in the centre comes out clean.
8. Remove cakes from oven, and let cool on wire rack.
9. Once cooled, put one cake layer face down. Spread cream cheese frosting. Add another cake over the frosting top, again facing down.  Spread frosting over the top and around the cake.
10. Garnish with toasted and coarsely chopped walnut.

Frosting 
228gm cream cheese
1/4 cup (56gm) butter
2 tablespoon Maple Syrup
2 cups icing sugar

1. Cream butter and cheese together until light and soft
2. Add maple syrup to the mixture. Combine.
3. Add icing sugar to the mixture. Mix on medium speed until thoroughly combined.  Frosting is ready.

Friday, October 17, 2008

Quick-and-easy chocolate cake

Yet another super easy recipe that's low in sugar and fat content! No whipping, whisking or beating is needed. Just combine all ingredients in the same bowl, and one is ready to bake in 15 minutes. This recipe is contributed by fellow baker friend, Zaeda, and is a great alternative to ready-mix cake mixture sold in supermarkets. As the recipe is so healthy, one can afford to have it with any ice-cream of choice, without feeling horribly guilty after eating.

Sunday, October 12, 2008

Coconut Cake With Lemon Curd

I had not anticipated the complexity of this recipe (adapted from www.joyofbaking.com) that calls for numerous rounds of whisking, beating and mixing of different ingredients in separate bowls. Certainly not something that one should attempt to do when time is of the essence. I started baking at around 9.30pm and did not finish till about 1 am.  I took the picture this morning after refrigerating the cake overnight to let it set. There's a distinct taste of coconut in the cake, and the lemon curd balances it very well. For those who love coconut, you will appreciate this recipe.  Apart from the laborious baking process, there really isn't that much to be said about the recipe. However the lemon curd is delicious and goes really well with simple butter cakes. This is as much I will recommend.  Here's the full recipe if you are interested to try it out.

Cake recipe:
6 large eggs (separate the yolk from the egg whites)
1 1/2 cups of all-purpose flour
2 teaspoon of baking powder
1/2 teaspoon of baking soda
1/2 teaspoon of salt
170gm of unsalted butter (room temperature)
1 3/4 cups of castor sugar
1 teaspoon of vanilla extract
60ml of coconut cream
1/2 teaspoon of cream of tartar

1. Pre-heat oven to 170 deg C. Butter and line two 9-inch cake pans with parchment paper. Set aside.
2. Whisk together flour, baking powder, baking soda and salt. Set aside.
3. In a separate bowl. beat butter with an electric mixer until soft, and gradually add 1 1/2 cup of the sugar and beat the mixture till light and fluffy. Add egg yolk slowly and beat well.
4. Combine the flour mixture with the butter mixture, to form a smooth cake batter.
5. Add vanilla extract to the cake batter and mix till combined.
6. In another bowl, whilst together buttermilk and coconut cream. Add the coconut cream mixture to cake batter and mix well. Set aside.
7. In another bowl, beat egg whites until foamy. Add cream of tartar and continue beating till soft peaks form. Add the remaining 1/4 cup of sugar and beat the mixture till stiff peaks form.
8. Fold the white peaks into the cake batter until combined (taking care not to over-mix)
9. Divide the batter between the two cake pans. Bake for about 1 hour (note: I used Yan Mum's little oven. Time to bake differs between ovens) or until a toothpick inserted in the centre of the cake comes out clean.
10. Let cakes cool on wire rack.

Lemon Curd:
3 large eggs
1/3 cup of freshly squeezed lemon juice
1 tablespoon of finely shredded lemon zest
3/4 cup of castor sugar
56gm of unsalted butter (cut into cubes, leave at room temperature)

1. Whisk together eggs, lemon juice and sugar in a bowl over simmering water until the mixture thickens (approx. 10 min).
2. Remove from heat, and stir in the butter cubes until melted.
3. Add lemon zest and let cool before refrigerating the mixture.

Frosting:
2 large egg whites
1 1/2 cups of castor sugar
1/4 cup of cold water
1 tablespoon corn syrup
1 teaspoon vanilla extract

1. Whisk egg whites, sugar, water and corn syrup in a bowl over simmering water, for about 3 minutes on low speed until the icing is shiny with soft peaks.
2. Remove from heat, add vanilla extract, and continue beating on high speed until the frosting becomes thick.
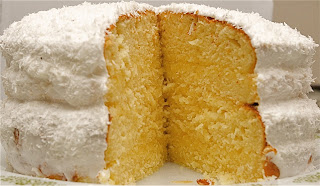
Garnish:
2 cups of shredded or flaked coconut

1. Cut each cake in half horizontally. 
2. Spread lemon curd generously on the cake layer, and sprinkle with coconut flakes. Stack the next layer and continue to work on the cake layers the same way.
3. Frost the top and sides of the cake with the frosting prepared, and sprinkle with coconut flakes.
4. Refrigerate.

Friday, October 3, 2008

Banana Bread

Quick and easy recipe where no fancy mixer is required is what I like doing most. I made this bread in between cooking green curry chicken and monitoring the stock market today. Preparation time was a mere 15 minutes. All one needs is a large bowl (where dry and wet ingredients are combined), a fork (to lightly beat the eggs) and a wooden spatula (to fold the wet mixture with the dry ingredients).  Baking time is about 60 minutes at 180 deg C (using Yan's Mum's retro-style oven again). It's that simple. The bread turned out quite all right (although not of the quality that I am proud to share it with anyone). It still needs some tinkering. 

Wednesday, October 1, 2008

Carrot Cake

Yan's Mum's cute little 80s retro-style oven remains functional despite its old age. Instead of staying underutilized in her store room, I've decided to put it to good use, and tested my friend's carrot cake recipe today. Thus, killing two birds with one stone. It's a super easy recipe to handle, even for novice bakers. Just mix all ingredients in the same bowl and shove it into a pre-heated 180 deg C oven to bake for about 1 hour and 15 minutes (note: baking time differs with different ovens, so you should always monitor the baking process, if you are using your oven for the first time for any recipe). The cake is fluffy in texture, not sweet and tasted healthy (as the recipe uses vegetable oil and has a low sugar content). I have omitted the frosting this time due to time constraint and lack of an electric mixer (as my KitchenAid is packed away at a rented storage place now). 
Here's the recipe (adapted from Marina Ismail's carrot cake recipe):
Ingredients
4 eggs (beat on medium speed for about 1 min to mix)
2 cups of grated carrots
3 cups of plain flour
1 cup of walnut (coarsely chopped)
1 cup of canned pineapple (diced)
1 1/3 cups of castor sugar
1 1/2 cups of olive oil
1 teaspoon of baking powder
1 teaspoon of salt
1 tablespoon of vanilla extract
Method
1. Pre-heat oven at 180 deg C. Line a 9-inch round pan with parchment paper.
2. Sift flour into a large bowl. Add baking powder
3. Add all ingredients into the bowl, except for eggs and walnut.
4. Fold beaten eggs into the mixture until incorporated
5. Add chopped walnut, and mix well.
6. Pour mixture into the cake pan
7. Bake for about 1 hour and 15 minutes, or until a skewer inserted into the cake comes out clean